When put into groups for the 'Group Game Project', my group decided
to take a broad approach to the assignment. We split
into three smaller groups, each developing one game idea into a
minature pitch that we scheduled to deliver to eachother. For this
pitch, I developed the idea of a fantasy and D&D themed gardening
simulator, for which I created multiple pieces of concept art,
to help my teammates to visualise my proposals. My teammate for
this pitch created concept art for the landscapes and areas, whereas
I focused on the playable character, and the gameplay aspects.
Figure 1.0.1, Initial Ideas
This was the first piece of concept art that I created for this project,
I wanted to keep the character simple, but to still convey clearly that
he was a wizard. Keeping the model simple was mostly the choice of our
3D student, but I was also able to experiment a lot with these restrictions.
Having a simple, cloaked protagonist allowed me to channel inspiration from
one of my favourite indie games, Journey. Journey was released on the 13th of
March in 2012, and set the tone for many games that would follow. The game has
no dialouge, and a passive tone- this peaceful and serene gameplay, filled with
colourful, fantastical locations has been replicated in many indie games, so
it seemed to be an appropriate inspiration for ours.
As seen in my notes, these restrictions also allowed me to experiment with
interesting design choices, like the ability to use magic to make items move.
From a development perspective, this allowed for easier coding, and less complex
animations, and from design, it allowed for a more readable character, as magic
also conveyed our protagonist's wizard title.
Figure 1.0.2, Further Experiments
On my second page of sketches, I started to experiment with the type
of character we wanted for our game. Initially, I had wanted to use
the typical, human, elderly wizard- but thinking about other indie
games, like Journey, I realised that the protagonists are often non
human. To appeal better to the target audience of existing passive play
indie games, I decided that a simple and less human character would
be more effective.
My first sketch on the page was the orc. I thought that an orc would
be an interesting and subversive idea for a character in such a passive
game, but decided that it may have been unfair on our 3D student, who
had requested we make simple designs.
My second sketch was the dragonborn character. I did like his simplistic
face, but I was unsure, again, of how difficult it would have been to model.
Also, I was not sure if I would have to alter the costume design due to his
spiky head shape, and his tail. despite our protagonist being simple, I still
wanted them to read as a wizard.
Finally, I designed the goblin. The goblin protagonist design seemed to have
no issues: it was very simple, which was great from a modelling perspective but
I also felt that I had effectively reached the look of an indie game protagonist.
The lack of a mouth and other facial features reminded me of the recently released
indie game 'Omno', which I used as further inspiriation for the rest of the project.
I felt that Omno was a great inspiration, as the game was actually created by one
man, over the course of five years which gave me constant motivation when, at times,
I had to create the game by myself.
Figure 1.0.3, Colour Experiments
For my colour experiments, I first tried to keep to earthy tones for the
costume, but I felt that they did not convey wizardry, so on my next line of
colour tests, I tried using bolder colours that I felt would go well with
the character's green skin, and look more fantastical. At the time, I was still
unsure of which one to go with, but I would later decide on the purple colour.
With the character roughly designed, it was time to move on to experimenting
with the gamplay and perspective of the game.
Figure 1.0.4, Game Perspective White Box
Figure 1.0.5, Game Perspective Coloured
Initially, we had chosen a top-down perspective for our game, with
the whole game taking place in a greenhouse or barn of some kind.
There would be a crafting table for the player to turn their plants
into potions, and two menus, Inventory and Crafting, for the player
to manage their produce and sell their stock. I conveyed all of this
in my illustration, and had begun to think about the layout and the menus.
Figure 1.0.6, Side Scroller Perspective Experiment
Despite the top down view being the original idea, I decided to experiment
with a side scroller view. This would have the game appear more 2.5D, with 3D
assets in a flatter enviroment. This was inspired by another indie game,
Unravel, which features another protagonist with eyes, but a lack of other
facial features.
As well as the stylistic similarities, I thought that Unravel
would also be a good inspiration for the project, due to its internal messages
about pollution and energy. For this project, our game is required to support
sustainablity Goal 7, "Ensure access to affordable, reliable, sustainable and
modern energy for all". Unravel supports this in a number of subtle ways, such
as having dangerous wires and electricity being an obstical to the player, and
even showing a scene in the sequel, Unravel 2, where a forest fire is caused due
to non eco friendly and sustainable energy being relied on too frequently. I was
a large fan of the way the game showed this, but it was often shown in the
background, or hinted at subtly, due to the non-speaking nature of the protagonists,
who observe these events.
Figure 1.0.7, Flower Growth
Figure 1.0.8, Example Flowers
An issue early on in the project, was our 3D student feeling overwhelmed with
creating models, which was going to be difficult in a game with multiple flowers.
To combat this, he requested that the models were exactly the same, with just the
colour changing to differentiate between them. I took this into concideration, and
began to create concept art showing examples of flower growth, using this principle.
I proposed a simple, four step growth cycle, and eight examples of alternating coloured
flowers, that could be recoginised by name and colour alone. For the plant names, I
leaned further into the D&D inspiration, with I felt added to the fantasy tone.
INTERNAL PITCH 1.1
Using all of the work I had created, I pitched the idea to my group. The other ideas
at the pitch were a tower defense style game, and a puzzel platformer, which were
developed by other group members.
For the pitch, I came up with the name 'Alchemist's Garden', and presented all of
my concept art pieces to my group. The project was met with success, as it won our
internal vote with five out of the seven votes, which was refreshing to see that we
were mostly all on the same page.
Through a group discussion on goblin names, we eventually decided on the name Marrow.
I felt that this was the best choice due to the duality of the word: goblins are known
to be feral creatures, and Marrow seems to conote bone marrow- but a marrow is also a
vegetable, suggesting the farming and passive side to the game and character.
With this decision, we bagn to prepare for the larger pitch, to the class and lecturers.
PITCH 1.2
When pitching our idea to the lecturers, it was initially received well: they liked
our ideas, and found the game to be very imaginative and unique. The main problem
with the project though, was the lack of a clear link to sustainablity Goal 7. As a
farming game, Alchemist's Garden promoted sustainablity through agricultre; however,
the brief had required sustainable energy. Another issue was the appearance of the
protagonist: a lecturer mentioned a similarity between Marrow and Grogu, and we were
requested to alter their design.
Our game proposal was actually rejected until we could come up with a solution to
these issues, so we began to brainstorm ideas.
As the creator of the character, I began to come up with different ideas on how to
alter the design, without losing the resemblanace of a goblin. This was very challenging,
as the only similarities our character shared with Grogu were the large, triangular ears,
bald head, and green skin- everything else was already different, like white eyes instead
of black, lean stature instead of small, and the distinct lack of facial features. And
yet, resemblanace remained an issue.
Changing the ears or skin would have resulted in a less distinctly goblin character,
so there was little I could change wihtin these parameters. I decided that for the great
of good, we would have to change the protagonist's race. The colour scheme of the game was
green, purple, and orange, so I decided to change the skin to an orange tone, and to pitch
Marrow as a Hobgoblin- the slightly larger race of goblin creatures that all had a red-ish
skin tone. With this decided, the character design issue appeared to be sorted.
While brainstorimg how to make our game better appeal to sustainablity Goal 7, we decided
to scrap the barn area previously shown in my concept arts, and instead opt for a more
eco friendly outside area. In Figure 1.0.6, I had drawn large lamps over the crops, which
I decided would be less sustainable than having our character choose to use natural
light. We also decided to further develop the idea of having a wind generator, or another
form of natural energy, to be present on Marrow's farm, to further our sustainablity
message. We also decided to have Marrow grow real, endangered, British plants, to
further our link to enviromental awareness.
We pitched these new ideas to our lecturers, and they were accepted. With this, I got to
work with the redesign, and began to work on coding.
CHARACTER REDESIGN 2.0
With our new angle as a Hobgoblin, I began to draw some colour varients of a altered
design.
For the Hobgoblin design, I experimented with three main features:
-Skin Colour
-Ear Size
-Ear Angle
Figure 2.0.1, New Ideas
For the angling of the ears, I tried to make them appear more upturned, to lessen the
resemblanace to Grogu, same with the ear size. The change in skin tone from green to
orange also helped, and made Marrow's resemblanace to a Hobgoblin more obvious.
However, when I showed this to my group, the old design still appeared to be everyone's
favourite, so we had another group discussion, and I was asked to draw Marrow with green
skin and large ears, but to point them upwards, and to give them an earring, to add to the
Goblin appearance, and hopefully detract from the Grogu similarity. I began to experiment
with these ideas.
Figure 2.0.2, Second Pass
I drew a picture as requested, and it was met with a much better response than the first
pass of experiments, so I decided the upturned ears were a good step moving forwards.
I also decided to draw a piece of promotional art of this new design in the garden, to
help myself visualise this new design.
Figure 2.0.3, Promotional Art
Seeing this design in the game setting really helped me to see the issues with the design.
I did not like the lack of orange in the design- at the time I felt that the orange earring
was not enough, and looked rather out of place with all the purple. Most pressingly, My
issue was with the upturned ears and the hat: I felt that the upturned ears made the hat
look like it was about to fall off, or has been pushed to the back of Marrow's head like
a sun hat. The group, however, were very attached to the hat, and did not want it to change,
so I focused my attention to the colour imbalance.
Figure 2.0.4, Third Pass
I tried to experiment with all of key colours for our game with this pass of designs,
and looked for colour combinations which I thought were pleasing. I brought back the
idea of orange skin, and also experimented with purple skin. I actually really like
the way that purple skin looked, but it appeared to bat-like, and I felt that it lost
some of the goblin feel. On this pass, I also experimented much more with goblin traits,
like the earrings, and holes in the ears.
When I pitched this to my group, there were some mixed feelings, but I was told which
features everyone liked, and was to combine them all in a final illustration. The original
colour pallet was also still everyone's favourite.
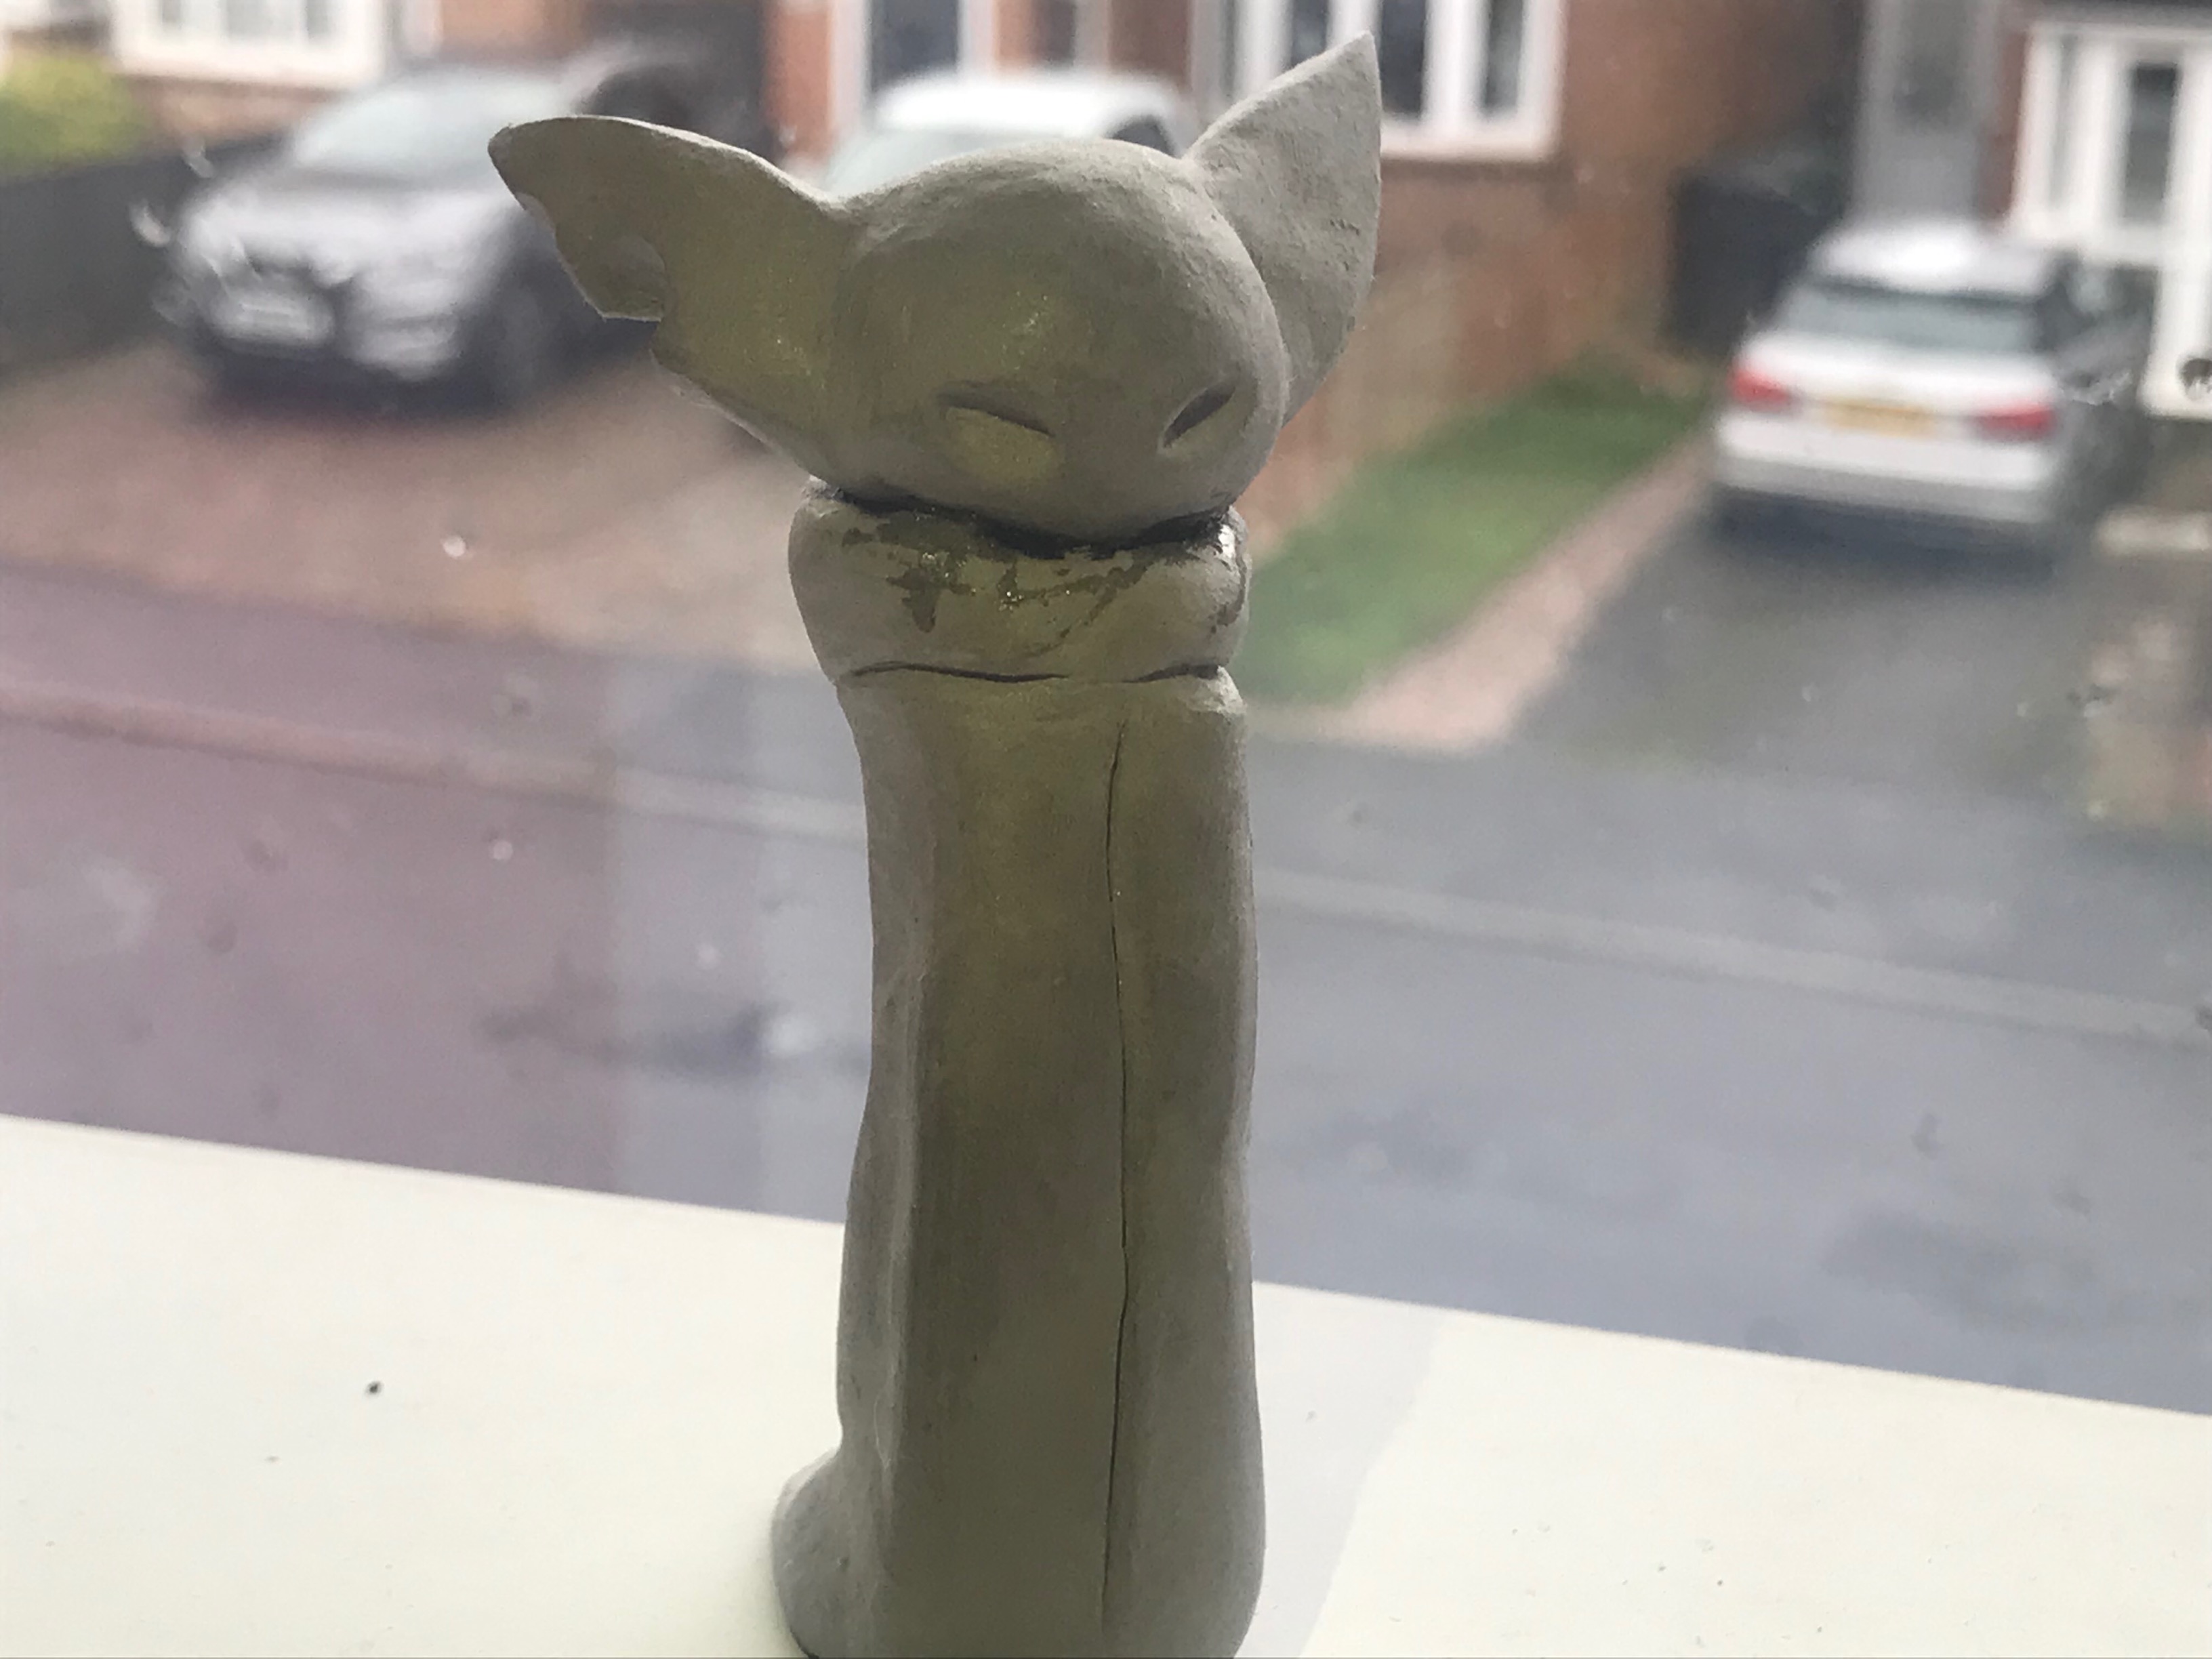
Before creating the final illustration, I created a small, clay sculpture of Marrow, to
help the 3D student to visualise my drawings in a 3D space. When seeing the character in 3D,
it became obvious that the hat would not work with the new ears, so I began to experiment.
Figure 2.0.5, Clay Sculpture
Figure 2.0.6, Clay Sculpture Continued
Initially, I had drawn one extra drawing of Marrow wearing a brim-less hat. I thought this
would be an adequet to the ear problem, but it was met with an overwhelmingly
negative response from two members of the group, who then requested I try other hats.
10 redesigns later, I ended up with this page of ideas:
Figure 2.0.7, Fourth Pass
This was possibly the most frustrating step in the project, due to the sheer amount of
time that I felt was being wasted; a mistake which I will avoid when taking part in
future group projects. I was asked to draw a hood, but then asked to redraw it because
it was not tight enought, then asked to draw a hood that was somewhere inbetween those
two tightnesses- it was extremely disheartening and unnecessary. I was already consious
of the fact that the design process had gone on longer than expected due to the Grogu set-back,
so all this did was make me nervous about time. This was worsened when after drawing ten new
designs, a member of the group requested that we wait two extra days to have an in-person meeting,
as she was unhappy with these new designs, and couldn't put it into words over messaging.
In future projects, I will continue to value my teammate's input, but will not let it cause
set-backs in production. I feel that a lot of time was wasted, and that definitely caused
issues later into the project.
FINAL DESIGN 2.1
During our in-person meeting, there were still disagreeances, but I had decided that
if a conclusion did not occur, then I would simply decide myself. At this point, I felt
that was one of the only things I could do to disable this delay from lasting much longer.
Eventually, we came to an agreement on the design with the orange skin and cone hat; however,
there were still members of the group who were very negative towards this, even stating that
they hated it, but the design had won the group vote, so luckily it was only the minority.
With the design finally chosen, I created one final, rendered piece to give to the 3D student,
along with the sculpture. The sculpture did not, however, have a hat due to all the changes
during its creation. So I hoped the illustration would help where the sculpture could not.
Figure 2.1.1, Final Choice
Figure 2.1.2, Final Illustration
Drawing the rendered piece was very refreshing, and was a nice change of pace from
the previous week or so of group votes over a goblin's hat or skin colour. I
actually really enjoyed drawing the final illustration, and it felt great to see
the character finished, and fully designed in one final picture.
With the design phase finally complete, it was time to focus on coding and creating
the game in Unity. I actually had no prior coding experience before this course, so
I often found this part challenging, but I am still happy with the outcome, knwoing
that I did the best I could.
WHITE BOX WORK 3.0
I was completely new to all of the software used to create this game, which was
not a good sign. Due to technical difficulties at the University, I also had not
been able to practice with Unity during lessons, so this whole project was
essentially my practice run. This did feel a bit stressful at times, but I did my
best to focus on the outcome, and to use this as a learning experience.
I had white boxed one room before, a small mock up a green house for our pitch,
but I had never yet written any C# code. To ease myself into the project, I started
off by white boxing all necessary scenes, and then adding code.
The project direction had changed slightly since its debut, due to help and guidance
from my lecturer for my Game Design pathway. I was advised to make the game from an
isometric angle, and to have multiple scenes connected by a map feature. This made the
game feel a bit more complicated, but also provided enough work, as our group had two
gaem design students. My partner for the project had two years prior coding experience
at a different university, so he advised that he tackle the more complicated mechanics
that the game would need.
With this, I began to create a white box, based off a drawing that I had requested
from one of the group's designers.
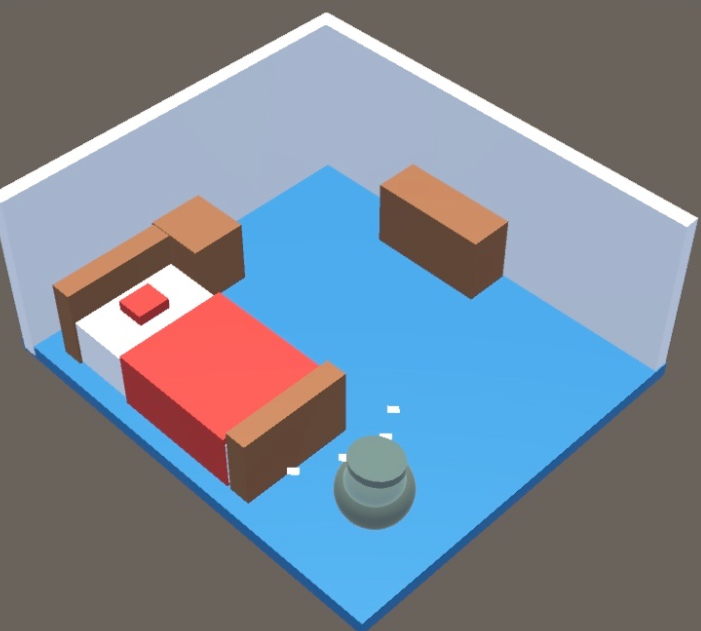
Figure 3.0.1, Bedroom White Box
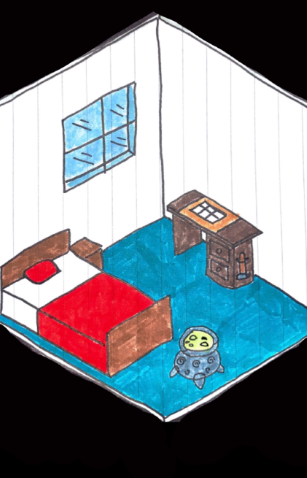
Figure 3.0.2, Bedroom Sketch- Robert Berrisford-Smith
The bedroom was the first white box that I created for this game, and I was closely
following the design and layout plan created by Rob, one of the group's designers.
I really liked the blocky style of the bedroom plan: it reminded me of some of the
live research that I had done in preparation for this project, with Minecraft being
one of the most popular games mentioned when I aksed my 13 year old brother to ask
his friends for their favourite low-poly or simple games. Minecraft was one of the
most popular, so to notice stylistic similarities was a good sign.
After this, I created a very simple white box for the overhead map, the garden and
the market place.
Figure 3.0.3, Map White Box
Figure 3.0.4, Market White Box
To change between the scenes, I created objects which I named after each area:
gardenButton, marketButton and houseButton. To these objects, I then equipped some
basic code that I found in this
Youtube tutorial. The tutorial was very helpful, and allowed for me to successfully
change between the scenes in the project, which was a core component for our game.
To make this work, it was necessary to have one script to manage the others, and
another script per button.
Here is the code I used:
Figure 3.0.5, Management Code
Figure 3.0.6, Load Farm Code
With the basic scene changing, and white boxing done, it was time to move onto some
of the more complicated mechanics that I had to program. These ranged from character
movement, to a day to night cycle, complete with a timer in the corner. I had to
consult many more Youtube tutorials to get these results, but considering my prior
inexperience, I am actually very proud of what I have created, and I feel as though
my coding abilities have vastly improved.
DAY NIGHT CYCLE 3.1
One of my favourite parts of this whole project is the result of the day/night cycle.
At first, I was very unsure that I would be able to complete something so complex;
however, I did, and I am very proud of the end result.
For this mechanic, I was heavily aided by this
Youtube tutorial. The tutorial was challenging to follow in places, due to the
complicated nature of the mechanic, but after a few rewatches and noticing my errors,
I was able to successfully replicate it.
There were four main aspects to this code: the rotation of the sun, the timer in the
corner, the switch between sunlight and moonlight, and the ability to carry the variable
across to the next scene. Unfortunately, this tutorial did not include the latter, so I
focused on the other aspects, and knew I could return to consistency later.
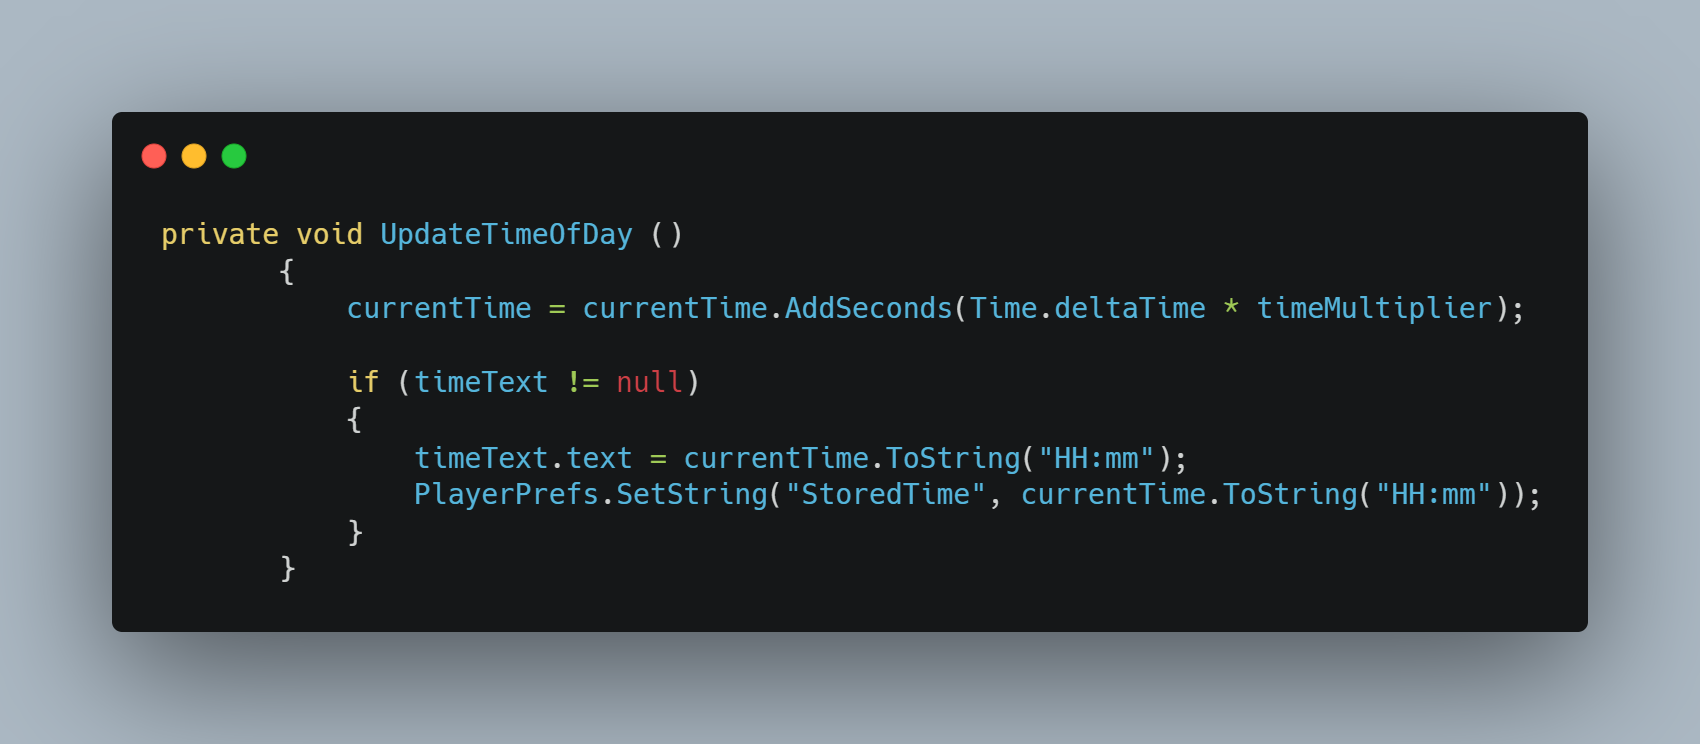
After setting the variables in the void Update function, I defined them in their own
voids:
Figure 3.1.1, UpdateTimeOfDay Variable
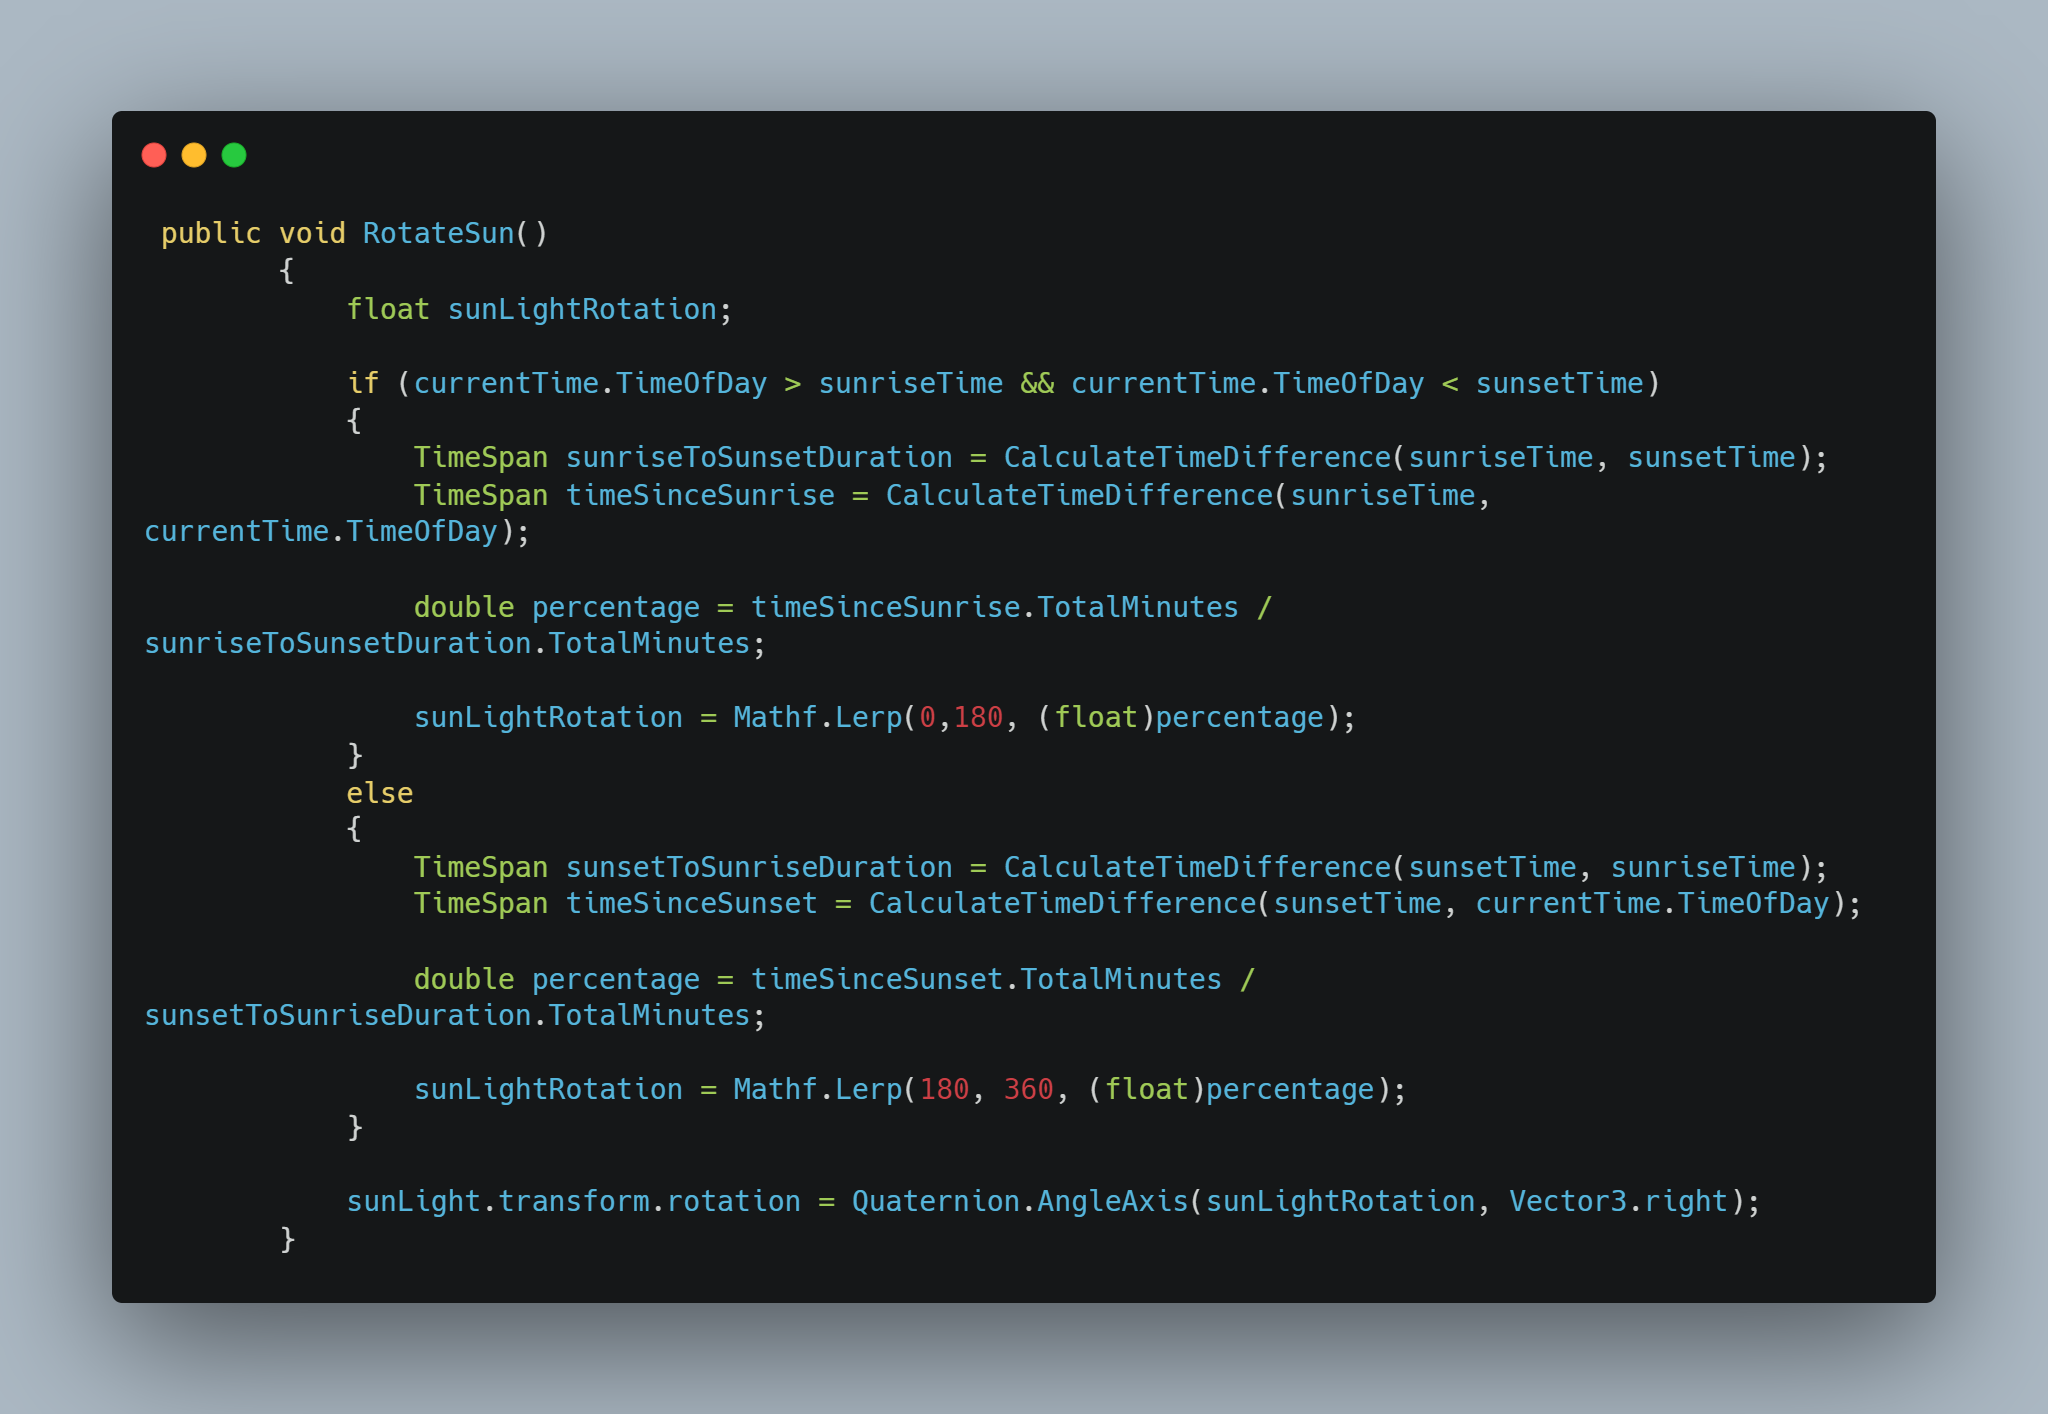
The most challenging function in my opinion was the rotate sun feature. This required
me to used lerps and other functions that I was mostly unfamiliar with, but recoginised
from another tutorial I had used for the move feature. Despite my challenges with this
section, it iste t
he most rewarding bit of the whole tutorial. It looks very
polished and impressive, especially when sped up so the process is more visible.
Figure 3.1.2, RotateSun Variable
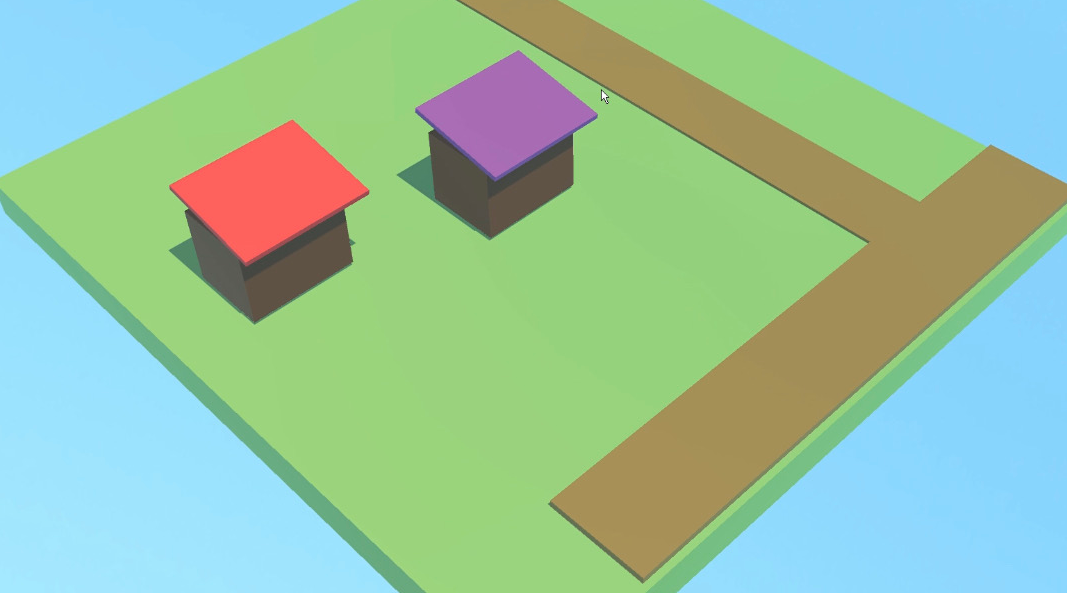
For this tutorial, I focused on the bedroom scene, which at that time was still in a
white box state. I still think it looked really impressive in this state, and even
reminds me of Minecraft.
Figure 3.1.3 Day Night Beta
Later in the project, I was sent models by our 3D student to add to the game, and
the scene evolved to look like this:
Figure 3.1.4 Day Night Updated
Although this was my favourite result of the project, it was also very challenging
at times, but I definitely think it helped to expand my coding knowledge: with this
completed, I was now feeling much more confident in my abilities, and understood the
content of the tutorials that I was following a lot better.
MOVEMENT AND ANIMATIONS 3.2
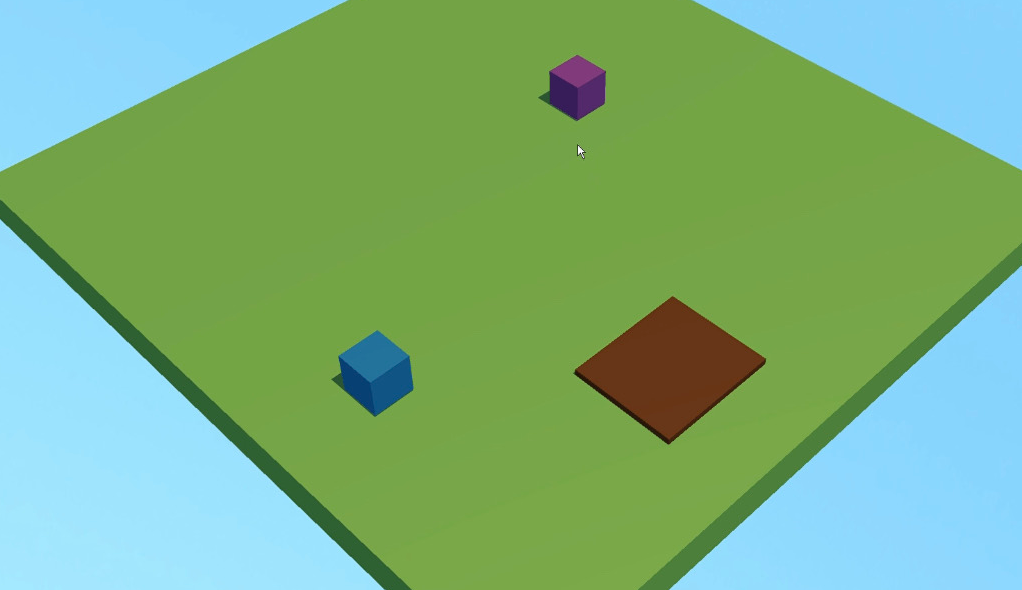
While working on the day night cycle, I was also working on the character movement.
For this section, I followed this tutorial,
that was actually a set task to watch from my lecturer. It was extremely useful, and
with the aid of this tutorial in particular, I really began to find myself understanding,
and even sometimes enjoying the coding process. At the time of following the tutorial,
I had not yet been sent a model, so I worked using a cuboid. This meant that I had to
deviate from the tutorial slightly, as the tutorial covered how to embed animations at
the same time as the movement, but it still worked fine.
The tutorial covered how to use a controller to move the character as well, which I
found very impressive. My only coding issue at this time was that I had equipped a
rigid body component to the character, which was not needed for the tutorial. This
caused the cube to spin once the controller was released, but this was a quick fix.
Figure 3.2.1 Early Prototype Video
Despite how simple this code is, it was one of the first things that I coded for the
project, so I thought it was really cool. This first tutorial really inspired
me to continue, even though I knew it was going to be difficult. Looking back after
completing later more complicated parts of the project, I still think this was a pivitol
part of the journey.
Over the next few weeks, I was sent the model, which I implimented as a child of the
previous Marrow_Object. There were a few issues in communication, and I was sent a
few faulty models with uncentered origin points, but I was eventually able to get the
animations to work.
When I was sent a model with a newly centred origin point, it was incompatible with
my scripts for animations, but it turns out that this one was not rigged, and it was
not an issue with my code or animation script. This was one of the most frustrating
parts of the project though, as I had to consult the same Youtube video about five times,
as I was told that the error was probably on my end. It was to be expected to have issues
like this during our first, professional group project, but it didn't make it any less
disheartening.
After getting the movement and animations finally fixed, my fellow Game Design and
Development student asked me to write some basic code for seed collection, which he
planned to later add to his inventory system. For this, I used
this tutorial, but adapted it to fit the
collection in my game.
Here is the result from my movement system, animations work, and my basic collection:
Figure 3.2.2 Movement and Seed Collection Video
MODEL SWITCH 3.3
It was around this time when my group's other game student asked if I could
write a basic script to change between plant stages. He wanted to add it to
his planting mechanic once it was done, so it was only necessary to be
managed by button press at this time, so that it could be easily adapted.
I was slightly aprehensive, as I had no idea how to swicth between models, but
I found this
forum of Unity users discussing solutions to the same question, which I found
very helpful.
Here is the finished result of the model swap, which was currently changed
by the press of the space bar:
Figure 3.3.1 Plant Stage Progression Video
Other than these more complicated mechanics, I still had to add a title
page and continue to import models sent over by my 3D student.
TITLE PAGE 3.4
This step was one of the easiest so far, but I think it made the project look
and feel much more like a game. I was still currently waiting on a drawn
background from one of my Designers, so I used the Fantasy Skybox that I had
downloaded as a backdrop in the meantime. This Skybox is used across all of my
scenes, and is available to download here
for free.
Figure 3.4.1 Title Menu Video
The logo featured on the menu was designed by one of our design students, and
was used across all the marketing for the game, including the Alchemist's
Garden official Twitter page, which can be found here.
My individual Twitter account where I also advertised the game, can be found here.
With the movement and animations completed, the day to night cycle done, the seed collection
and plant growth finished, and now the start menu done, all that was left was finishing
touches, and to merge my half with my partner's half.
FINISHING TOUCHES 3.5
During the production of the game, I was sent many models
with issues. Most importantly the playable character being un rigged and having
an off-center origin point, but also smaller things like textures being completly
invisible, and random light emitting from trees. About a week before the final
presentation, my Game Design lecturer advised that I outsourced some models, to
improve the current look of the game, as it was still in a very basic state.
I was initally worried about this, as I didn't want to cause any group issues,
but I decided to trust in my lecturer, and search the Unity Asset Store.
I ended up outsourcing models from three packs, 'Low Poly Farm Pack Lite', which
can be downloaded here,
'LowPoly Vegetation Season Pack Lite' which can be downloaded here,
and 'Lowpoly Nature & Village Pack', which can be downloaded here.
I am actually really glad that my lecturer encouraged me to look for additional
models, as I feel that the game has vastly improved its visual identity, and
looks much more unified and stylised with the changes.
Another finishing touch to my half of the project was to make sure that the timer
and sun postion remained consistant across all of the scenes. This step was
extremely difficult, and there was little to no help online for this topic.
The one thing I did find was that it was recommended to have any kind of timer or
life bar as a prefab, which I then did, but it did not change the reset that
would occur everytime a scene changed.
With little else I could do, I turned to one of my lecturers, Lewis, for help.
Together in a one-to-one, we looked online and were able to find some code to
stop the object from destroying itself, and to let it carry over into other scenes.
The code was very complicated, but Lewis helped me through the process, and I ended
up with this:
Figure 3.5.1, StoredTime Variable
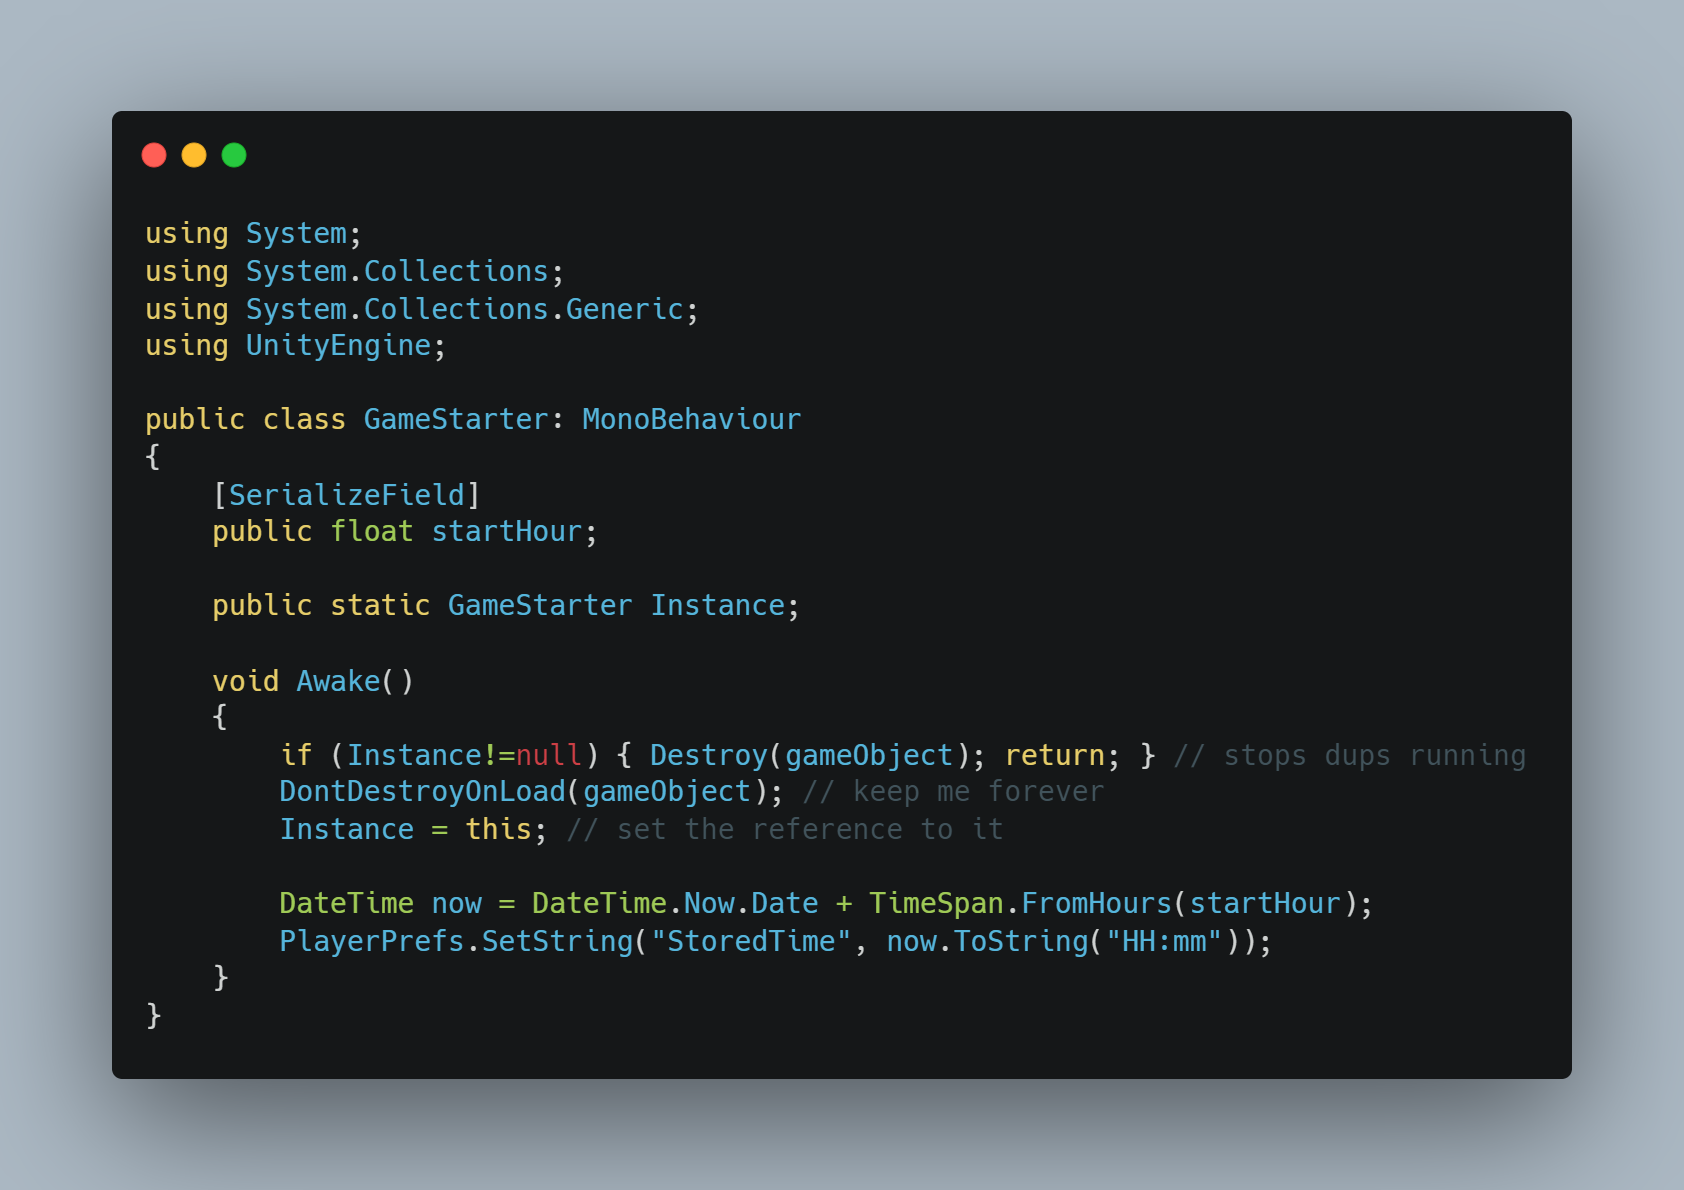
I also created a new script called GameStarter, which would call for the
stored time to be remembered, and used:
Figure 3.5.2, GameStarter Script
With both of these adjustments made, the game already looked, and felt, a
lot better. I really like how different it looks with the additional assets,
but it was also such a relief to see the timer finally run consistantly
across the scenes.
Figure 3.5.3 Final Touches
With this done, I sent my half of the project over to the other game student,
and began to create the powerpoint that my group were going to use for our
presentation.
FINAL PITCH 4.0
For the final pitch, I presented my game in its current state. We were actually
unable to have the two halves finished by this point: I had sent it over, but my
teammate had been busy the night before, and the nights leading up to, the
presentation. Even so, I presented my work, and the rest of the team theirs, and
the reception this time was much better than the inital pitch, which was great.
The only constructive critisism we received was about the lack of a merged project,
but that was something we were already aware of, so I was sure we could improve
upon it.
Despite the lack of a finished game, or demo, I was still encouraged to open the Unity
file and show what I had been working on, and the lecturers were very supportive of my
work, especially my day to night cycle.
After the pitch, we decided amongst ourselves that we would merge the game, and the
other members of the group had a few other things to work on in their own pathways.
CONCLUSION 5.0
Since the pitch, there were even worse issues with communication due to the holidays.
I tried to make myself available for help, or incase anyone needed anything, but no one
reached out. I messaged my other game design student frequently to check on the progress
of the game, but it was put off multiple times. When I did receive the game, the files
had just been copy and pasted into one another, without any adjustments to properly merge
both sets of work. I tried to fix it myself, but the code was more complicated than I
understood so I was unable. Initially, I was excited to have another game student in my
group, because I was worried about my own abilities, but I found the back and forth more
frustrating than most of the coding.
In hindsight, there are a few things I would have changed, if I were to have the chance
again, but overall, I'd call the project a success. It might not have ended in a finished
game, but I have developed my coding skills more over the course of these six weeks than
I would ever have guessed. I am becoming more and more comfortable with the software,
and am advancing in my coding abilities, which I am looking forward to continuing to
improve over my time at the university.
This project was definitely challenging, but I enjoyed it for the most part, and am
excited to tackle similar projects to come.
To play the game, you can follow this
link, but please keep in mind that it is in an unfinished state.